Showing posts with label Before and After. Show all posts

Tuesday, July 17, 2012

... reupholstered caned-back chair

I... I can hardly believe it. We finished reupholstering that chair!*

I feel like I've been looking at it in it's half-finished state forever. It feels so good to have it finally done! Not to mention it helps to have an extra seat in the living room. Here's the "before" shot and the whole story:

Sorry for the inexecusably awful pic. It's apparently the only one I took.
We got the chair at a yardsale a few years ago for about $20. The seat was really comfy and the caning was in remarkably good shape. We knew we'd eventually have to do something about the fabric on the seat, which was getting really threadbare. We used it as-was for a couple of years, until the fabric finally split and the front legs started to detach a bit from the rest of the frame. Rehab time!

We stripped off the fabric and the old foam underneath. Luckily for us, the cotton batting and coils were in decent shape so we didn't have to much about replacing those. George reattached the front legs and shored them up with some strategically placed wood screws. For the reupholstering, we followed the same basic steps we used when redoing the ottoman. Since we already had the coils, burlap and batting in place, the next step was attaching a new piece of 1" foam (George was on staple gun duty once again). Then the chair sat for literally months while I dithered about what fabric to use on the seat.


Finally I bit the bullet and ordered some velvety chenille (it was poly - all I could find - so really reasonable, about $12/yd) in an elephant-y gray. I think it makes a nice break from all the patterns in the living room - it's soothing (as far as chair fabric can be soothing). We stapled down a layer of batting before finally attaching the fabric. We chose to pull it all the way under the chair and staple to the underside, rather than to the front of the chair as the original fabric was attached. It was just a heck of a lot easier. Attaching the fabric was a little more complicated than in our ottoman job, because we needed to make release cuts around the arms and legs. They aren't perfect, but I was happy enough with them at the end of the day.


The last step was sewing a few lengths of double-welt cord and hot gluing it around the legs in the front, to cover the raw edge of the fabric and make it look purdy. Then... finally done!


Well, almost. We could still attach single welt cording around the entire bottom length of the chair for a really finished look - but I ran out of cotton cord. So until I get some more, this is finished enough for me. It looks puffier than the original, but I think it'll wear in over time. Plus it is just super-comfy to sit on. George has his favorite reading chair back, and the cats have another surface to completely coat in cat hair.


So what the heck else have I been doing for over a month since I posted anything? Lazy, lazy. I do have a few more projects to write about, one of which will explain my questionably legit excuse. More soon, but first let me bask in the glow of finally finishing* that damn chair!

*Mostly.

Monday, March 5, 2012

... reupholstered ottoman

The ottoman, it is finished! I am so seriously happy with the way it came out, and the fact that it's done. This is a project that we've had on deck for months, so it feels really satisfying. Without further ado, the process!

I was taking a walk around my neighborhood with my mum back in the fall when we spotted this oversized ottoman frame out by the side of the road.  Incidentally, "the side of the road" is one of my favorite places to find old furniture. In our very college-y neighborhood in Boston, we found tons of great stuff that way, especially when everyone was moving out at the end of a semester. Anyway, the ottoman seemed sturdy and, being made of wood, seemed to have a low possibility of harboring bedbugs (I left it outside for like a month, just in case), so we picked it up and carried it back to my apartment. In the "Before" shots below, you can see that we basically started out with the wooden frame and coils with most of the padding and fabric already removed.


The first thing we did was spend some QT with the pliers, a screwdriver and a claw-foot hammer, removing the many, many staples left over from the previous reupholstering job and the last bits of fabric that were hanging on. I'm not going to lie, this part was no fun. But with two of us (the two being me and George, who was my partner in crime on this project) working on it, we banged it out in a few hours. The next step was re-tying a few of the coils where the original cord had broken. Luckily for me, most of the string was in good shape and I didn't have to do too much. Then we stapled a large piece of burlap over the coils.

At this point I should mention that for the majority of this project I followed the excellent Upholstery Basics tutorial on Design*Sponge - you can check it out here. It's incredibly detailed and helpful and it you're tacking this kind of project for the first time, I think you'll find it invaluable. OK, moving on! Next step was to add a bunch of stuffing for cushioning. I actually used the insides of some couch cushions we no longer use, so we got in a little extra bit of up-cycling there.


The cats were super-intrigued by this part, so it was hard to get an in-progress shot without them in it. So after the stuffing, it was time for the foam. We used a large piece of 2"-thick foam, cut to the size of the ottoman with an extra half-inch on each side. George used spray-adhesive to attach pieces of burlap to the edges of the foam rectangle, which we used to pull down and staple to the frame. This gave a nice rounded edge all the way around.

Sorry for the crap picture quality - we were working on this at night. And watching TV.
Next was a layer of batting. I used high-loft quilting batting, which is the kind that comes in a big roll. We cut a large piece to fit and draped it over the top. To attach it, we actually separted the layers a bit around the edges, stapling the bottom layer and then smoothing the top layer down to hide the dimple left by the staples. Neat trick, huh?

God, this picture is even worse. Sorry!
At this point, it was ready for fabric! I used a cotton slub (feels kind of like linen) in a yellow and white ikat-ish pattern. This was another drape-and-staple layer - the only tricky bits were the corners and making sure we got the staples as close to the bottom trim as possible.


This was the point at which we could actually sit on the ottoman and use it, so we got a little lazy about actually doing the finishing work. This weekend we finally completed the last step, which was to sew double-welt cord and glue it over the exposed staples. I used this tutorial  on Centsational Girl for tips on how to sew the double-welt cord without the special presser foot made specifically for doing so, since I didn't have one. Then it was just a matter of hot-gluing the cord over the exposed staples, just above the decorative wooden trim.


That's it! I just used a little Murphy's Wood Soap on the frame to shine it up, and it was 100% done. I'm so happy with the way it came out. It was definitely the most complicated reupholstery job that I've tried, but was also the perfect piece to start on since it was just a big rectangle - no arms or back to cut around. I was trying to figure out how much it cost overall - I think the materials set me back $60-$70 altogether (that's for the burlap, foam - which is always super-pricey although I got a pretty good deal on this stuff at Mardens's - fabric, batting and cord) which I don't think is too bad for such a large piece and I do have a bunch of materials left over for the next project. In terms of time, I'd say we spent 3-4 days on it, although we obviously weren't working on it all day on those days. Definitely a success for us - it's really comfy and has added two more much-needed seats to our living room. Well, really just one seat in the aggregate - while I was sewing the welt cord, George was stripping the fabric off and reinforcing the legs of an armchair that will be our next reupholstery project. It never ends! But that's kind of the point.


Wednesday, January 4, 2012

... set of reupholstered dining chairs

I sing of chairs and a (wo)man! My dining chair refinishing/reupholstering epic is finally over. Truth be told, I actually finished them up about a month ago - but December is always crazy busy and I was lazy about downloading and editing all the pictures I took of the process. But I’m really psyched about the way they came out, so I’m excited to talk about them now!
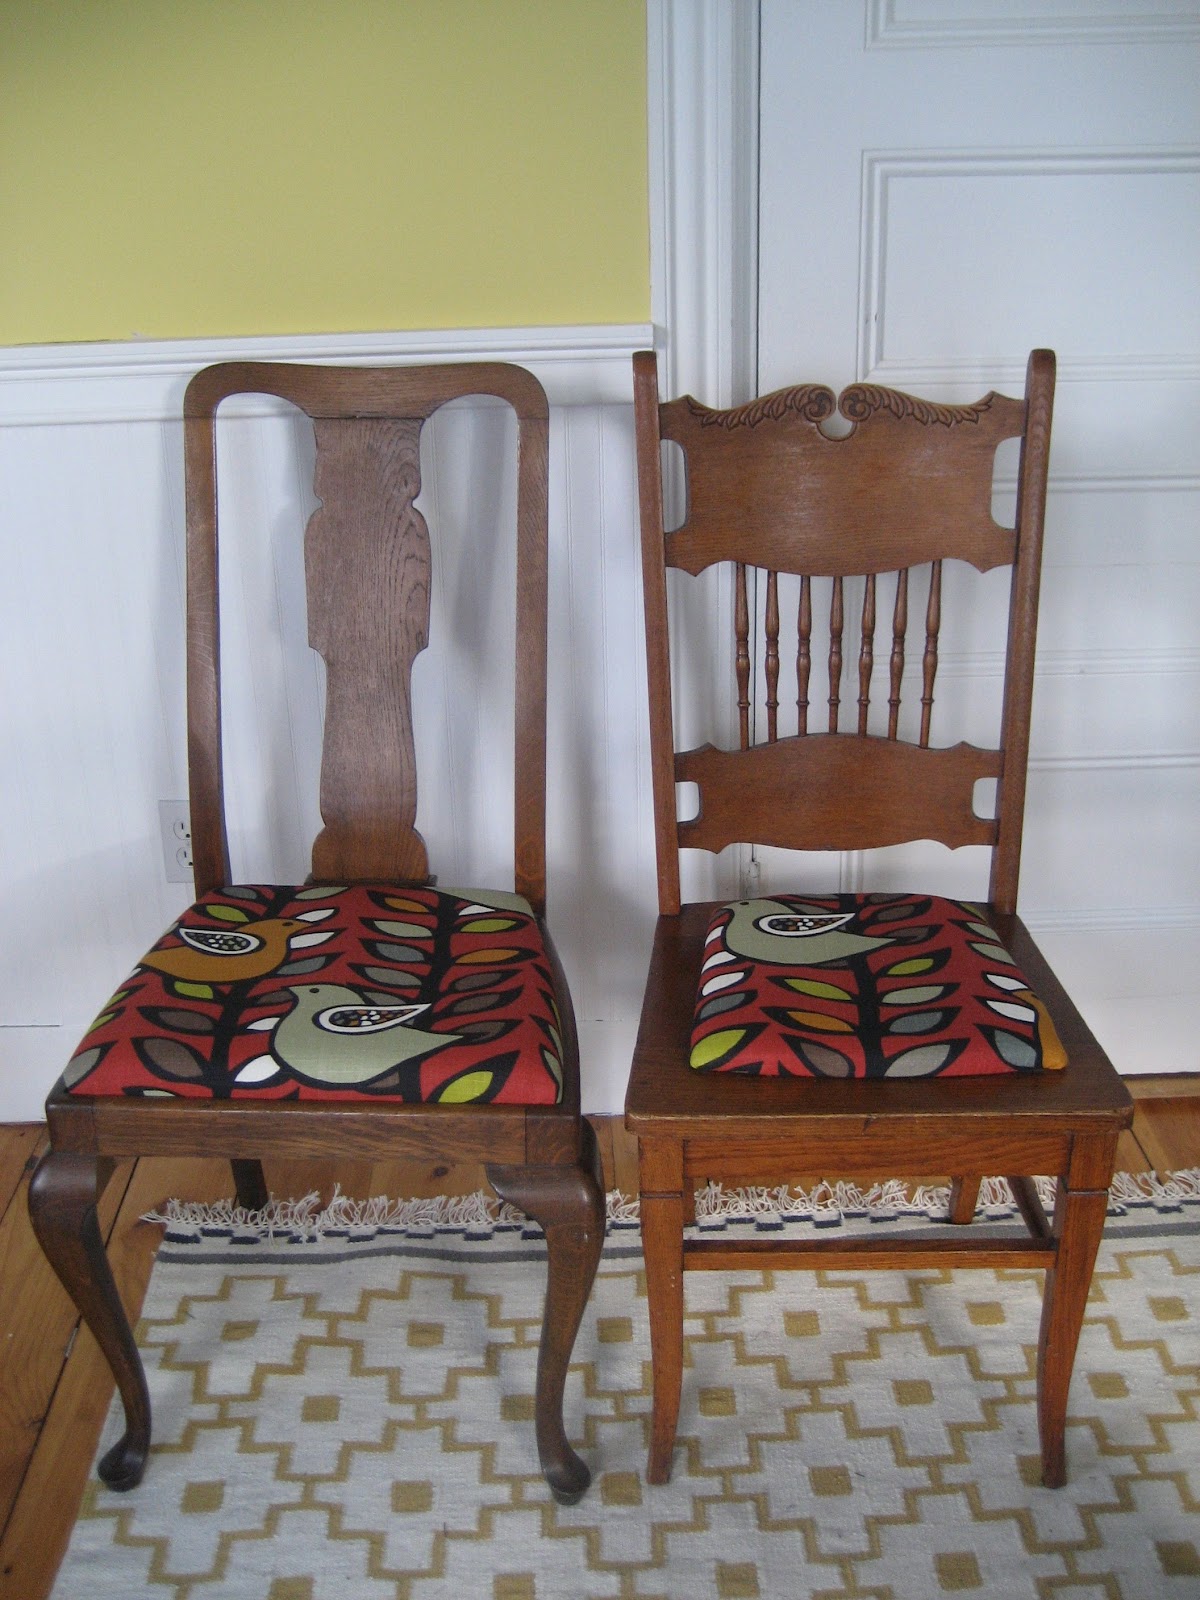
Here’s the backstory: my parents gave us four Queen Anne-style chairs that had originally belonged to my great-grandmother and were subsequently used by my grandmother and later, my parents. I remember our family using them when we were younger, but they had been in my parents’ basement for at least ten or fifteen years. We were pretty excited to get them, because they’re in pretty good shape and we needed some dining room furniture, as we’ve never actually had a dining room before. Because we were planning on getting a big table, we picked up two additional chairs at a local used furniture store in Old Orchard Beach. They weren’t a perfect match, but since they also had generally the same “honey oak” wood tone, tall backs and upholstered seats, I thought they’d look pretty well together. 

"Before" chairs, from left to right: previously refinished Queen Anne chair, lone original Queen Anne chair, and "fancy" chair from a second-hand store 
So here’s where I was at the beginning: four Queen Anne-style chairs, three of which had been refinished by my mum (wood stripped and stained, seats re-covered) and one which was virtually untouched; and two second-hand store chairs (which for ease of distinguishing the two sets I will now refer to as “fancy chairs”), which originally had caned seats but now had very worn leather seats. 
I tackled the recovering the seats first. When I really examined the Queen Anne chair seats, I realized that they had actually undergone several re-coverings, but that everyone that had done so had just put new fabric right over the old. I decided to strip all the fabric of and maybe add some new foam for a softer seat. Particularly when I found out what was the actual “cushioning agent” in these old chairs.
"Before" seats, clockwise from top left: pulling away layer #1 to reveal layer #2; layer #3 (groovy); original fabric (on un-refinished chair), and nasty, nasty horsehair.
HORSEHAIR. Isn’t that super-gross? I thought it was. I was particularly glad I stripped all the layers off outside, because the horsehair was so old that it was disintegrating into a fine dust and getting everywhere. Gag. The other tough part about the seat-stripping process was that the older fabric was attached with ancient, tiny, rusty little tacks that were too small to grab with a regular claw hammer. My dad luckily had a little tool called a cat’s paw (how cute is that?) which worked really well. And in showing my how to use it, he did half the work for me. Bonus.
While I was outside, I figured it was a good time to strip the Queen Anne chair that had never been refinished. The finish was way darker than the other chairs, so I hoped that using a stripping agent would lighten it a bit. That stuff is super-toxic though, not my favorite.

I think I was actually smiling under the mask.
It worked OK. What actually worked a lot better was vigorously sanding the crap out of it. That lighted the wood to the point where I thought it would actually take some stain. I used what literally may have been the same can of stain that my mum used to refinish the other chairs, as it looked like it has been in the basement for twenty years or so. After two coats of stain and about four coats of poly, I think the wood tone is pretty reasonably close to the other three. It’s a tiny bit darker and not quite as warm, but good enough for me.

Back to the seats! I now had four completely stripped wooden seat bases for the Queen Anne chairs - no horsehair in sight. The leather and plywood seats from the fancy chairs were in such rough shape, I decided to replace them completely. I used the discarded seat to make a template of the seat shape on kraft paper, which my dad used to cut me two seat bases out of plywood. Then it was a trip to the fabric store for fabric, 1” foam, and batting. 

Thanks, dad!
Chosen fabric - I put a bird on it. I can't help it.
These seats are absolutely the easiest type of reupholstery project - you just layer on all your materials and staple gun that junk to the bottom of the seat. For these seats, I cut the 1” foam to the shape of the seat, plunked it on, then wrapped the batting around it to soften the edges and stapled the batting to the bottom. Then it was just a matter of cutting the fabric a bit bigger than the seats, wrapping it over the batting and foam, and stapling that to the bottom. It’s really easy, you start by putting a staple or two in the middle of each side and then working all the way around. You have to finesse the corners a bit, but honestly the hardest part was deciding where to cut the fabric so that the pattern on the seat was aesthetically pleasing. I obviously bought exactly the amount of fabric I needed and then promptly cut one seat out upside-down, necessitating another trip to the fabric store. Obviously.

Layering the materials
I love staple guns. I got a new one for Christmas, actually.
Once the seats were covered, I had to reattach the hardware that was holding the fancy chair seats over the hole where the caning had been. Finishing the Queen Anne chairs was as easy as popping the seats back into the chairs. Done! Six relatively similar chairs, tied together by general shape, color and upholstered seats. I’m really happy with the way they came out. I’d show a nice picture of them in the dining room with our new table, but we ordered the table two months ago from West Elm and it’s still backordered. Details!


Friday, August 12, 2011

...adventure in dip-dyeing fabric

I spent most of last weekend at Filia's temporary Maine HQ (aka my parent's house), getting an huge assist from various family members on projects for Picnic. One project I was really excited to try was dip-dyeing fabric that I would then make into skirts. Dip-dying gives a lovely sort of ombre effect, going from light to dark. I was using white 100% cotton gauze and a mix of red and pink dye, so my ideal result was a dark, fuchsia red fading into a lighter pink, with a band of white preserved at the top. I had never tried this before and prepared by doing really the barest amount of research on the internet and basically winging the rest - which probably factored into the results. But more on that later.

It took us a while to figure out what our process was going to be. Because I wanted to use the fabric for skirts, it had to be oriented in a particular way. My mum also cleverly pointed out that all the fabric for one skirt should be dyed at once, since it would be hard to replicate the intensity of color or the exact fading pattern in two subsequent batches. The plan was to dip the fabric in the dye, leave it in there briefly, then raise the fabric up a few inches (so that the bottom of the fabric was still sitting in the dye) and let it soak for a few more minutes. We settled on a characteristically elaborate/MacGyverish set-up involving safety pins, dowels and bricks.

Eye of newt, toe of frog
We started out by making the dye bath according to the instructions on the box (as any of my friends who have played board games with me can tell you, I always read the directions). I used half a box of scarlet dye and half a box of fuchsia. Then we took our pre-cut pieces of fabric (cut a bit bigger than I would need for a skirt) and pinned the top of them evenly to a dowel, two at a time. We also decided in advance how low we would dip the fabric and where we would pull it out to in the second phase of the dyeing, and put safety pins on both sides of the fabric pieces to mark those spots (you can just see them on the picture below).

Wednesday, March 9, 2011

... lining for an old steamer trunk

While George and I were out for a run last summer, I spotted a sweet old steamer trunk at yard sale. We stopped and asked the yard sale proprietor if we could come back in a bit and buy it. We (quite literally) ran home and got some cash and the car - $12 later, it was ours (the yard sale lady threw in a little oil painting I liked for free - I love yard sales).

Hello, storage!

We are always looking for more storage in our little apartment, so this was a huge score. But before we could actually store things in it, it needed a little interior rehab. The originally lining was torn to the point of being unsalvageable and it smelled MUSTY.

Before: old lining, smelled like basement.