Wednesday, January 4, 2012

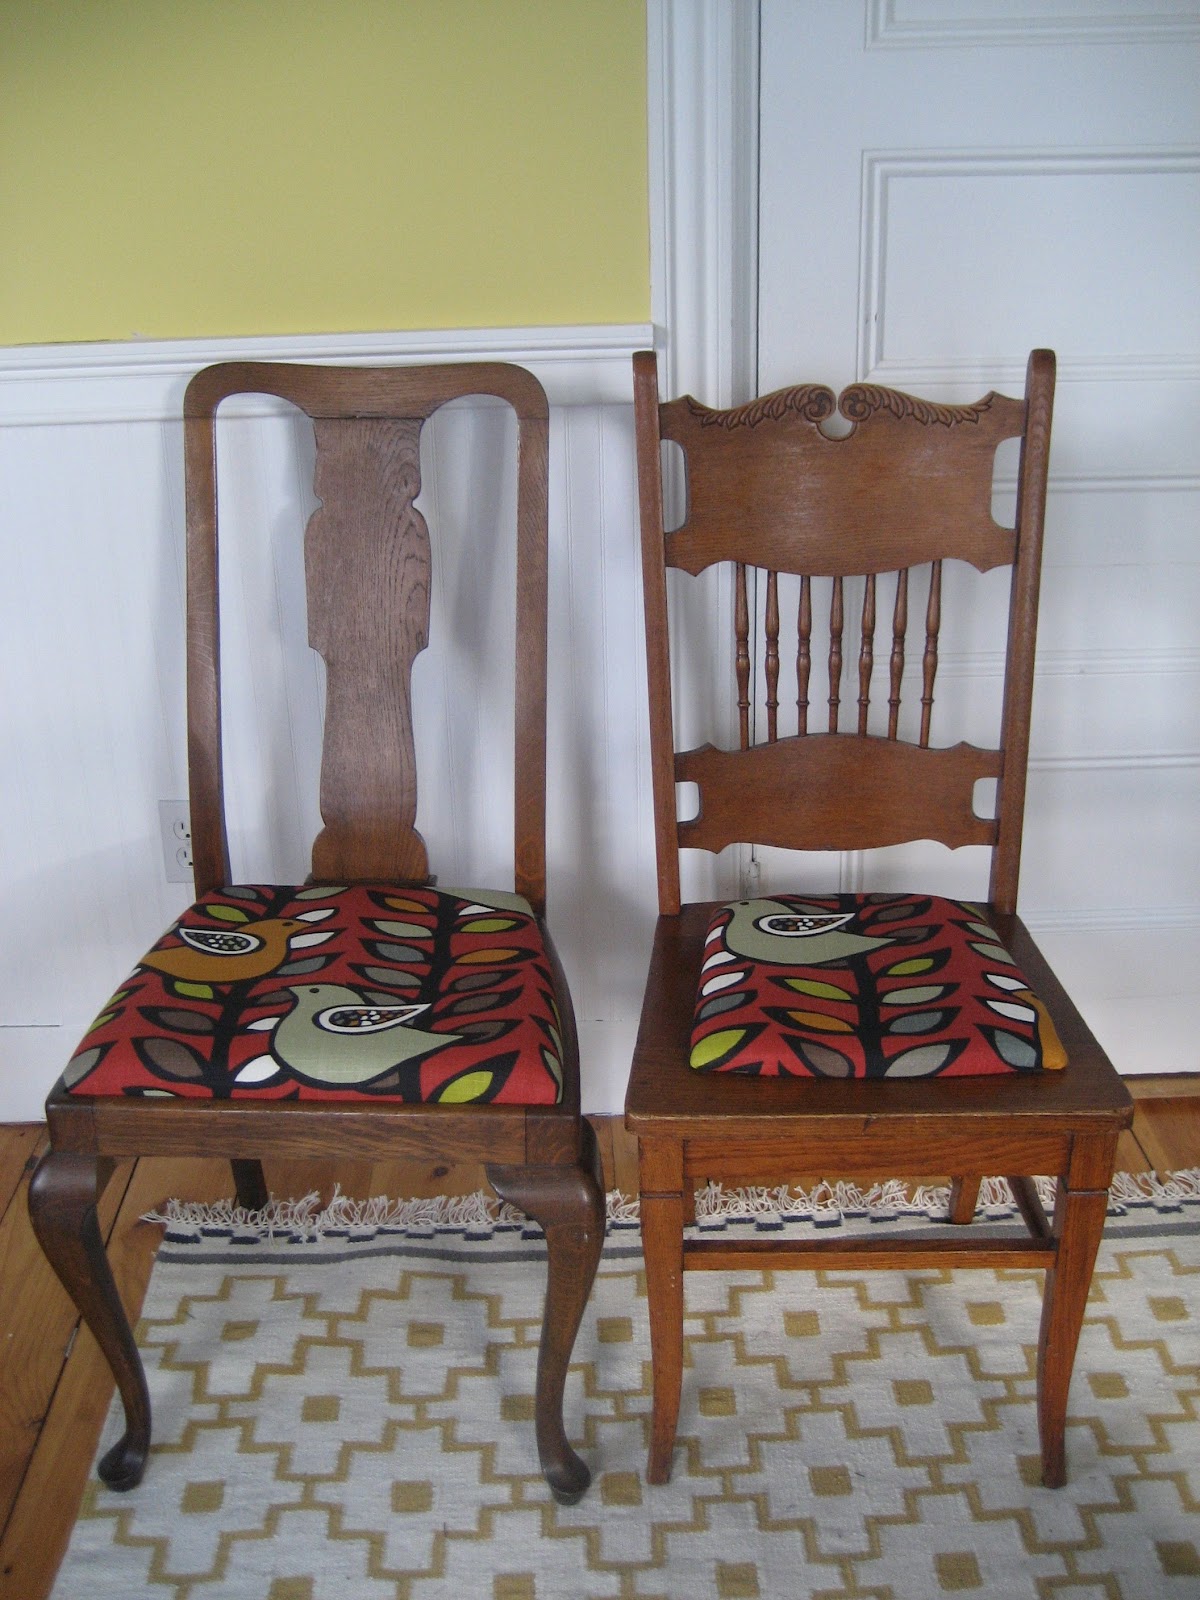
... set of reupholstered dining chairs

I sing of chairs and a (wo)man! My dining chair refinishing/reupholstering epic is finally over. Truth be told, I actually finished them up about a month ago - but December is always crazy busy and I was lazy about downloading and editing all the pictures I took of the process. But I’m really psyched about the way they came out, so I’m excited to talk about them now!
Here’s the backstory: my parents gave us four Queen Anne-style chairs that had originally belonged to my great-grandmother and were subsequently used by my grandmother and later, my parents. I remember our family using them when we were younger, but they had been in my parents’ basement for at least ten or fifteen years. We were pretty excited to get them, because they’re in pretty good shape and we needed some dining room furniture, as we’ve never actually had a dining room before. Because we were planning on getting a big table, we picked up two additional chairs at a local used furniture store in Old Orchard Beach. They weren’t a perfect match, but since they also had generally the same “honey oak” wood tone, tall backs and upholstered seats, I thought they’d look pretty well together. 

"Before" chairs, from left to right: previously refinished Queen Anne chair, lone original Queen Anne chair, and "fancy" chair from a second-hand store 
So here’s where I was at the beginning: four Queen Anne-style chairs, three of which had been refinished by my mum (wood stripped and stained, seats re-covered) and one which was virtually untouched; and two second-hand store chairs (which for ease of distinguishing the two sets I will now refer to as “fancy chairs”), which originally had caned seats but now had very worn leather seats. 
I tackled the recovering the seats first. When I really examined the Queen Anne chair seats, I realized that they had actually undergone several re-coverings, but that everyone that had done so had just put new fabric right over the old. I decided to strip all the fabric of and maybe add some new foam for a softer seat. Particularly when I found out what was the actual “cushioning agent” in these old chairs.
"Before" seats, clockwise from top left: pulling away layer #1 to reveal layer #2; layer #3 (groovy); original fabric (on un-refinished chair), and nasty, nasty horsehair.
HORSEHAIR. Isn’t that super-gross? I thought it was. I was particularly glad I stripped all the layers off outside, because the horsehair was so old that it was disintegrating into a fine dust and getting everywhere. Gag. The other tough part about the seat-stripping process was that the older fabric was attached with ancient, tiny, rusty little tacks that were too small to grab with a regular claw hammer. My dad luckily had a little tool called a cat’s paw (how cute is that?) which worked really well. And in showing my how to use it, he did half the work for me. Bonus.
While I was outside, I figured it was a good time to strip the Queen Anne chair that had never been refinished. The finish was way darker than the other chairs, so I hoped that using a stripping agent would lighten it a bit. That stuff is super-toxic though, not my favorite.

I think I was actually smiling under the mask.
It worked OK. What actually worked a lot better was vigorously sanding the crap out of it. That lighted the wood to the point where I thought it would actually take some stain. I used what literally may have been the same can of stain that my mum used to refinish the other chairs, as it looked like it has been in the basement for twenty years or so. After two coats of stain and about four coats of poly, I think the wood tone is pretty reasonably close to the other three. It’s a tiny bit darker and not quite as warm, but good enough for me.

Back to the seats! I now had four completely stripped wooden seat bases for the Queen Anne chairs - no horsehair in sight. The leather and plywood seats from the fancy chairs were in such rough shape, I decided to replace them completely. I used the discarded seat to make a template of the seat shape on kraft paper, which my dad used to cut me two seat bases out of plywood. Then it was a trip to the fabric store for fabric, 1” foam, and batting. 

Thanks, dad!
Chosen fabric - I put a bird on it. I can't help it.
These seats are absolutely the easiest type of reupholstery project - you just layer on all your materials and staple gun that junk to the bottom of the seat. For these seats, I cut the 1” foam to the shape of the seat, plunked it on, then wrapped the batting around it to soften the edges and stapled the batting to the bottom. Then it was just a matter of cutting the fabric a bit bigger than the seats, wrapping it over the batting and foam, and stapling that to the bottom. It’s really easy, you start by putting a staple or two in the middle of each side and then working all the way around. You have to finesse the corners a bit, but honestly the hardest part was deciding where to cut the fabric so that the pattern on the seat was aesthetically pleasing. I obviously bought exactly the amount of fabric I needed and then promptly cut one seat out upside-down, necessitating another trip to the fabric store. Obviously.

Layering the materials
I love staple guns. I got a new one for Christmas, actually.
Once the seats were covered, I had to reattach the hardware that was holding the fancy chair seats over the hole where the caning had been. Finishing the Queen Anne chairs was as easy as popping the seats back into the chairs. Done! Six relatively similar chairs, tied together by general shape, color and upholstered seats. I’m really happy with the way they came out. I’d show a nice picture of them in the dining room with our new table, but we ordered the table two months ago from West Elm and it’s still backordered. Details!


Friday, December 2, 2011

… retail location for Filia

I have really exciting news to share: my handmade clothes and accessories collection, Filia, is now available at The Merchant Company at 656 Congress Street in Portland, Maine! I’m really thrilled to have a brick-and-mortar retail location, and even happier to be among the awesome stuff available at The Merchant Co. Seriously, this place is stuffed to the gills with cool handmade and vintage items, lots of it from local vendors: ceramics, clothing, knit items, jewelry, bags, vintage housewares, skin care, baby stuff… you could find a gift for pretty much anyone in there (including, of course, yourself).


So the pics above are my little set-up. Items available right now include my wide elastic-band skirts in a variety of fun prints and solids, a few linen dresses, some newer print dresses and tunics, small zipper pouches, and cotton yoga mat bags. Some items are similar to ones available on my Etsy site, while others are unique to The Merchant Company location. I'll be adding new stock pretty regularly as well!


Here are some close-ups of the yoga mat bags. May I suggest, I think these would make a fantastic holiday gift for the yoga enthusiast in your life! They’re handmade with 100% pre-washed cotton, fully lined, reinforced in the bottom and the strap, and have neat features like deep side pockets (for your cell phone, socks and whatnot), a key ring, and an adjustable strap.

George and I knocked together this display for these flower pins I make from fabric remnants. We used scrap wood from my parents’ house, but my dad wasn’t around to help us use the table saw (AKA The Mangler), so we had to use a hand saw! It came out pretty dang good, though.

So this holiday season, consider shopping local and check out The Merchant Company! It’s right down by Longfellow Square on Congress Street in Portland. And then let me know what you think!


Wednesday, November 23, 2011

... appearance on another blog

A few weeks ago I was contacted by Laura from Fore Front Fashion, a very hip blog that chronicles the innate fashion sense of us Mainers - Bean boots and all. She ended up stopping by the apartment to chat about my little clothing venture Filia and take a few pictures of my sewing room and inventory. You can check out the results here, here and here (as usual, I think my cat steals the show). I was super flattered that Laura wanted to feature Filia on her blog and am still blushing at all the kind things she said in her write-up!
If you’re not already a regular reader of Fore Front Fashion, I would totally recommend that you add it to your list. It does a fantastic job of spotlighting modern Maine fashion without veering too far into what a friend calls “lumberjack hipster”. It also has great info on local fashion-related events, local shops and vendors. Flag your favorites and patronize them this weekend on Small Business Saturday!!
In other making-things news, my sister Erin and her friend September helped me rephotograph a lot of my Filia items for my Etsy shop. Thanks to them, it looks a whole lot brighter and attractive! There are a few new pieces, too, so check it out here if you’d like to see the fruits of that labor.
*Noted* fashion photographer Erin.

I’m also in the middle of a chair-refinishing project that has unexpectedly turned into a bit of an odyssey. I’m hoping to finish that up and have something to show for it this weekend. After, of course, eating myself stupid. Hope everyone has a very happy Thanksgiving!! 

Wednesday, November 16, 2011

... fabric-covered roller shade

The fixing up of our new apartment continues! And while I never feel like a room is ever really “done”, I’m getting pretty close to “done for now” with my sewing room. In fact I’m almost ready to do a whole before-and-after post about it, but in the meantime here’s a quick little project I knocked together for the lone window in that room.
First I should say that I really have a thing about mini-blinds, and that thing is deep dislike. They are ugly, insanely irritating to clean, and it drives me absolutely nuts when the bottom is crooked after you pull them up. So of course there are mini-blinds in every single window of our new place, and I will be systematically eradicating them one by one.
The mini-blinds in the sewing room were particularly bad in that they were broken - some of the strips were snapped off on one side. This left an exposed hole when the blinds were down and when you pulled the blinds up, some of the strips would hang diagonally below the bottom. It looked like the mini-blind had a hernia. 

To replace it, I wanted something clean and simple - no drapes that I would bump into or get caught up in when I’m moving around the room working on sewing projects - but would add a shot of color to the room. Privacy isn’t much of an issue for that window, because it looks at the side of the building next door about four feet away. For the same reason, light quality really isn’t a big issue either. So I decided to use a simple roller shade and cover it with a colorful fabric - done and done.


This was a super easy project to prep for - just unrolled the roller blind and washed it, measured it, and cut the fabric to fit with a rotary cutter (adding about two inches to each side). The I ironed the fabric, took everything outside, and used my trusty spray adhesive to adhere the fabric to the shade. The one issue was how to finish the sides. I initially thought I’d wait for the adhesive to set and then use a rotary cutter to trim the extra fabric right to the edge of the shade, but I was concerned it would eventually start to fray. So I decided to wrap the sides around and glue them on the back, thinking no one would see the back side, anyway. However, I totally forgot that you see the back side of the shade on bit that’s rolled up. I don’t hate the look of the fabric on the sides - because the fabric I used has a white background, it kind of looks intentional, like a border - but I do wish I had trimmed the excess so that the sides were even. Right now one side is wider than the other. But it’s not driving me crazy (YET). So if you use this method, make sure to trim the edges even before you glue them down to the back. Or, you could cover the roller up with a valance or something (I’m just not a huge fan of valances).


Then George took down the hated blinds, installed the roller shade hardware, and we hung the shade. That’s it! I will say, the fabric makes the shade a little heavy, so it doesn’t spring up as quickly or enthusiastically as a shade normally would - but this doesn’t really bother me. I love that this was a pretty dirt-cheap project, which is my favorite kind. The fabric was from Marden’s and I think was about $4/yd, and I bought two yards, so that’s $8 for the fabric. I actually got the roller shade from my parents, who had a few leftover after changing some window treatments in their house, so that was free. And I already had the spray adhesive. So all in all $8 and about 2-3 hours (including drying time and installation) and I’m up one unique, colorful window treatment and down one nasty set of mini-blinds - I’ll take it. Only 13 more windows to go!!


Wednesday, November 9, 2011

... baby gift and a characteristic mistake

Lots of my friends have been having babies lately, so I find myself making my fair share of baby clothes as gifts. I mostly enjoy it, because baby clothes are so small that they work up quickly - it’s like instant gratification sewing. Plus I think it’s generally accepted that things that are smaller versions of regular-sized things are magically cuter, like kittens and Smart Cars.
My friend recently had an adorable baby girl, so I was excited to make something ruffly and pink. I decided to work off of a pattern (Simplicity 2572), which I find relaxing every once in a while. Making my own designs usually involves a lot of agonizing over the measurements and details, whereas working off a pattern is just following the directions. It’s like playing with Legos - clearly the best part of Legos was throwing all your sets together and making whatever you wanted, but sometimes you just want to follow the directions and end up with a giant pirate ship, you know?
For this project, I found this adorable printed pinwale corduroy at Joann’s that matched some solid pinwale corduroy I had leftover from another project. I wanted to make the jumper and matching hoodie, so I got right down to it. I had my fabric, my pattern - so far, so good.
Here’s the jumper:


Cute, right? Kind of a pain to have to put in a zipper - I usually try to avoid them on baby clothes - but otherwise straightforward. And here’s the hoodie:


Have you spotted the problem? That’s right, I cut out the entire hoodie UPSIDE DOWN. All the owls and the trees and the hearts are wrong side up. Such a silly, easily avoidable mistake!! I didn’t notice until I had already cut all the pieces, and then I didn’t have enough fabric left to start over. Plus it would have seemed an awful waste to toss the upside-down pieces and I really didn’t think my friend would mind all that much. But it was a good, albeit aggravating reminder to slow down and double-check all my fabric and pieces before I cut - basically to measure twice, cut once. Classic advice for sewers and carpenters everywhere!


Wednesday, November 2, 2011

... lined jewelry drawer

I am so in love with this project! It was so fast and easy, it almost feels like cheating to call it a project at all. And credit where credit is due - it was 100% George’s idea.
Here’s the background: our new place doesn’t have a linen closet or much bathroom storage, so we bought an old dresser at a yard sale that tucks perfectly into a little alcove by the bathroom door. It has three deep drawers and two shallow drawers at the top. The bottom three I filled with towels, sheets and bathmats. I filled one shallow drawer with facecloths and hand towels, but didn’t really have enough of them to fill both shallow drawers. So the question was, what to put in the top shallow drawer? 
The other half of the background story is that I have lots of big necklaces and bangle bracelets and have never found a good way to store them. I’ve kept the necklaces in a jewelry box, but they get all tangled - hanging on the inside of a door, they get banged around every time you open it. And bangle bracelets take up lots of space. So George’s awesome solution was to line the inside of the top shallow drawer with some kind of fabric and store the big jewelry in there - out of sight, untangled, and easy to access.

Come on, isn’t that such a great idea?! And it was so easy to do. I bought some velvet at Joann’s - about a half a yard, so not very expensive, plus I think I used a coupon. I decided to go with royal blue, as a bit of a joke - like the crown jewels! Except that the priceless items displayed on this royal blue velvet are mostly from H&M, Forever 21 and flea markets.

After I cleaned, lightly sanded and measured the drawer, I used a rotary cutter to cut the velvet into a piece about 1” larger than the drawer bottom on each side. Then I took the drawer, velvet, and some spray adhesive outside (this was before it snowed(!) this weekend), sprayed the inside of the drawer (I stood it up against the side of the house) and adhered the velvet to the drawer. Then, back inside, I used a combo of an Exacto Knife and little snippy scissors to trim the edges off the velvet to fit the drawer bottom perfectly. Then it was just a matter of cleaning up the sides of the drawer with a little Goo Gone to remove any stray spray adhesive. That was it! Less than an hour. And this is the result:

It works perfectly - everything stays in place when you open and shut the drawer, it got all that stuff off the top of my dresser, and frankly I think it looks really cool. A really elegant solution to the jewelry storage problem, my favorite kind.
Now what to do with the outside of the dresser is still up in the air. When we bought it, I assumed I’d paint it and change out the hardware, and I had a color in mind. Now I’m not sure about painting it, or at least not about the color. I think I have to live with it for a little bit more before I decide. 

Tuesday, October 11, 2011

... sparkly bridal bolero

In my last post, I promised more “soon” - and as that was weeks ago, it’s now apparent to all that I have a very lackadaisical sense of time. Actually, parenthetically, one phrase I overuse more than any other is “the other day...”. For me, it can mean something that happened last week or last year - it’s the perfect temporally ambiguous qualifier for a forgetful person like moi. But it does kind of drive George nuts.
ANYWAY, back on topic, I have a really fun project to share. I do believe that I mentioned my exceptionally talented friend Emily designed the logo/business cards/other assorted collateral for my Filia clothing this summer. As she is a super-busy graphic designer, I didn’t expect her to do this for me gratis, so we bartered for it. I love bartering - it makes me feel like I’m back in elementary school playing Oregon Trail, only with less fording and my whole party isn’t dying of dysentery (I was not very good at Oregon Trail). Emily was planning an October wedding in Napa Valley, so we decided that my half of the bargain would be some kind of coat or wrap that she could wear during dinner (in a wine cave, so cool!). 

Here's where we're going with this. Read on for details!

After a bit of brainstorming, Emily settled on a loose, open jacket made from sequined fabric that would sparkle in the candlelight. She bought the fabric in San Francisco and shipped it to me in Maine with her measurements while I worked on the design. I knew the color and shape of Em’s gorgeous dress and wanted to complement that, while also keeping the shape simple (since it was made out of blinged-out sequins) and comfortable. It went through a couple iterations, but ended up being a pretty basic bolero shape with bell sleeves. It was disco-fabulous with a little hint of 1930’s glam!

Working with the sequined fabric was a new experience. After I had made a dry run of the jacket out of muslin to get the shape I wanted, I cut the pieces out of the sequined fabric. 
Estelle, helping me work out the design in muslin

Faaaaabulous fabric